Using iNaturalist Tutorial 2: Making Observations (Website)
Hi everyone, I'm a new admin on this project! I love inaturalist and hope you all do, too. So, here's a tutorial for uploading observations if you aren't using the app (honestly, I prefer the app, but sometimes you gotta use the website - I find its the only way to successfully upload audio files and animated .gif images - which yes, you can do!)
Look here if you want a tutorial for uploading from the app.
Getting Started
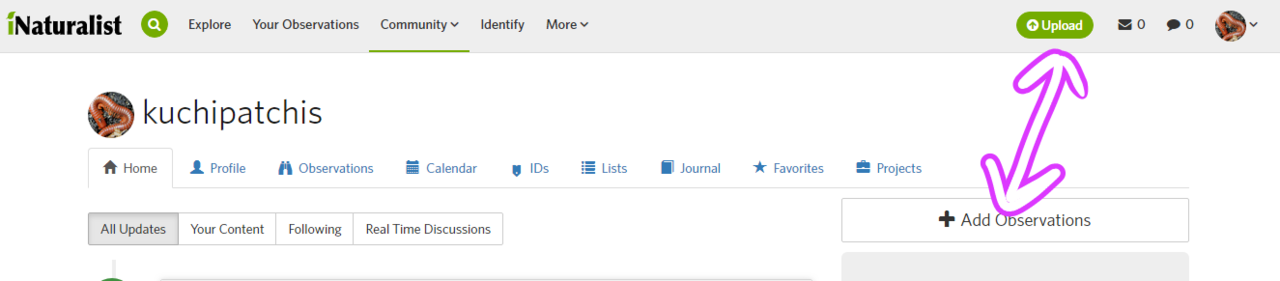
So, step one. On the website, you will find there are a lot of ways to do the same thing. Pick whichever upload button tickles your fancy.
Once there, we're going to get this screen:
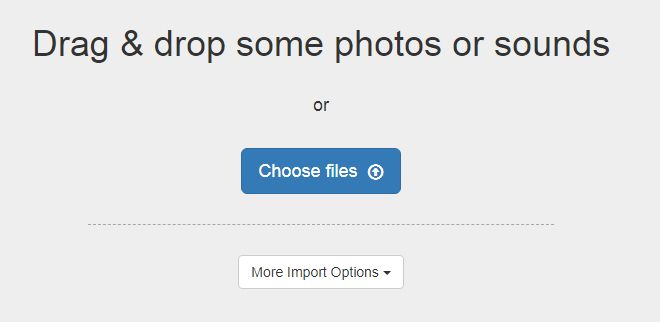
Drag your files, or click the "Choose files" button to select from a window. Again, whichever tickles your fancy. If you are uploading multiple files for one observation, they will have to be combined into one single observation. More on that at the bottom of this tutorial.
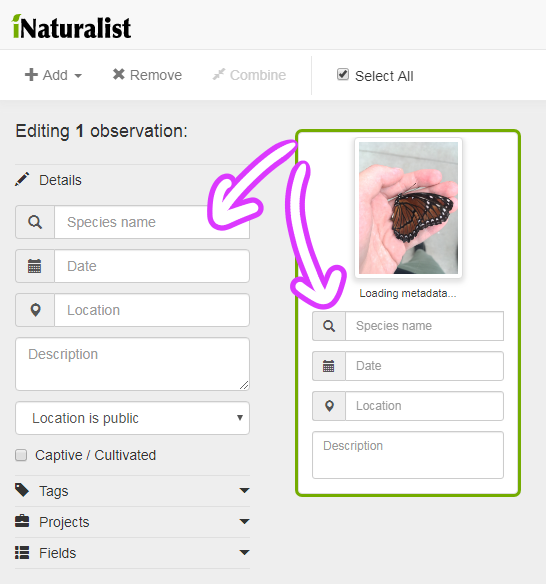
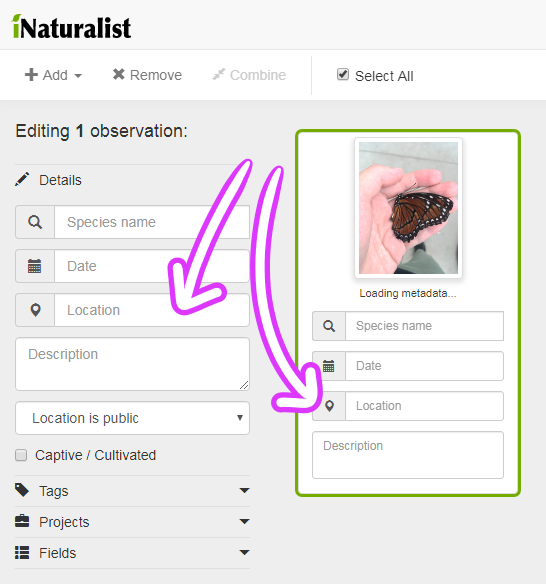
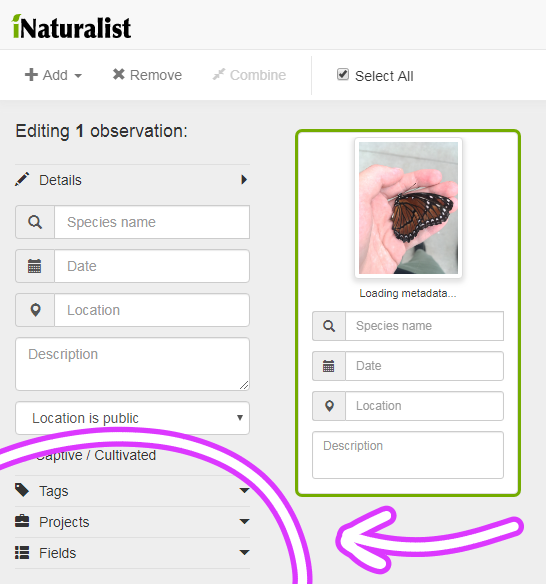
Once a file(s) are added, we will see this:
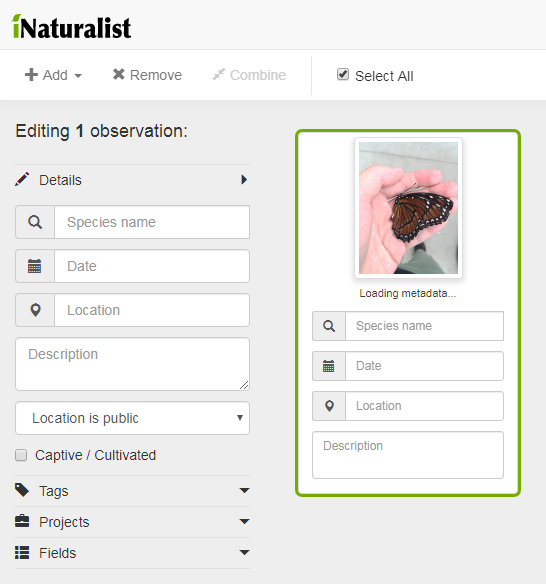
Great! But, there's a lot going on here! Let's take it a little at a time.
Filling Out the Important Details
First, let's identify what I found here. To do that, we need to click on either of these boxes:
And the computer vision will add suggestions. It's not perfect, but it's a good starter. Let's see what it's suggesting:
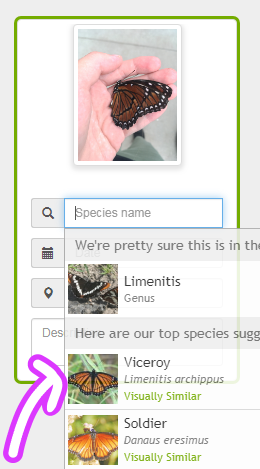
Great, I thought so! I'll click there on that suggestion, so it's now identified as a Viceroy!
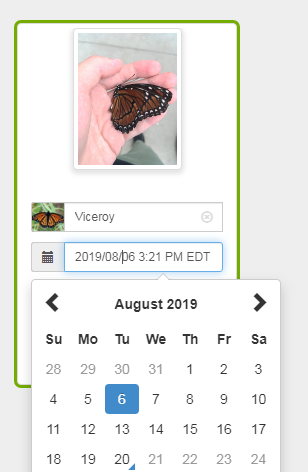
Now, the observation should have the date it was taken.
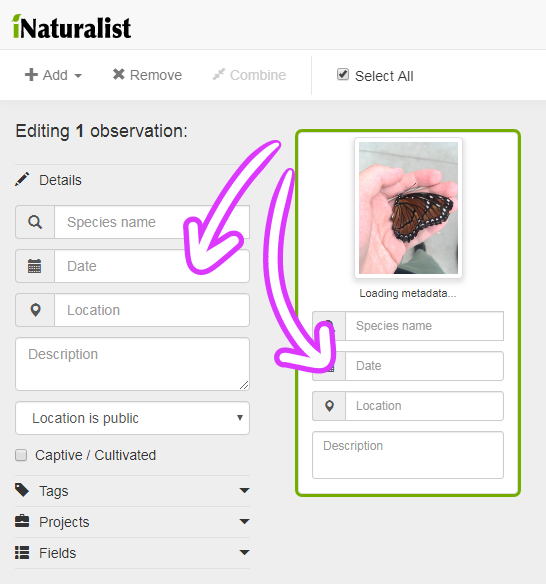
This was on a trip, so although it will automatically suggest the current date and time, i need to pick the right date on the calendar provided, or type it in the text box.
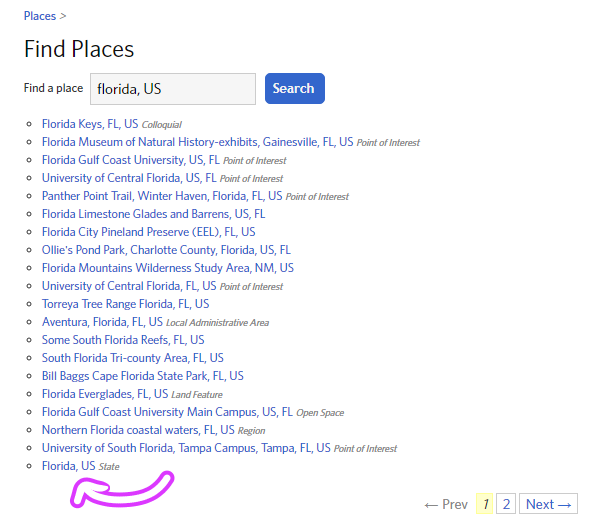
Now that that's done, the observation needs a location - where did I find this butterfly?
There's a couple ways I can record this. Since it was a named location, the easiest thing would be for me to type the location into the text box.
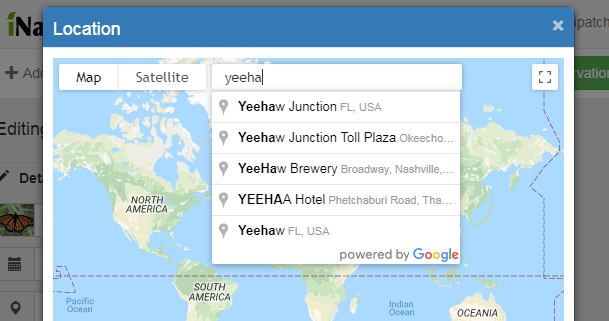
Alternatively, I can play around on the map, zoom in, and click on the approximate location I was in.
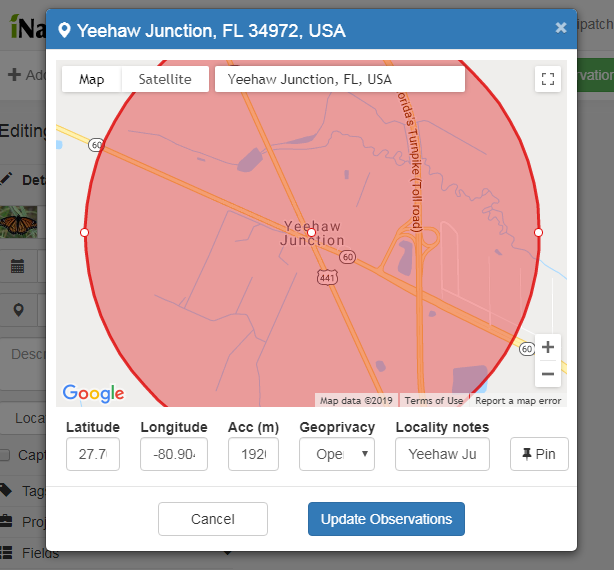
The border of the red circle can be expanded or shrunk as a sort of margin of error, saying the observation took place somewhere in this circle. As long as the observation was in fact inside of the circle, the location is considered accurate.
Now, after the location, what's left is all optional, but can help give context to our observation.
Optional Details
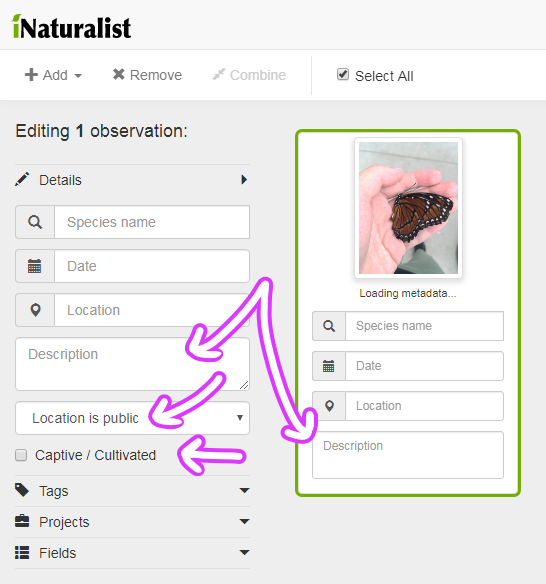
The "Description" text box is there for you to add any commentary you want.
The dropdown box saying "Location is public" shows the privacy settings of the observation. If this was at my home, I would select the dropdown box and either select to obscure the location (meaning the location is placed randomly in a big box similarly to the circle discussed earlier - the true location of the observation is inside the box, but no one knows where) or make it private (theres no knowing where the observation was). I prefer obscured, because the information is still useful if its just a handful of kilometers off.
To quote the app tutorial:
If you are wondering, “Why is location even important? Why should I bother?” There are a couple answers! First, there are very few species present worldwide. For the most part, in order to identify something, it is essentially to know where it was. Sometimes, you can be vague, and just stating the country is good enough detail to identify something (common for larger animals, like birds and mammals, and larger plants like trees). But other times, you need to be extremely specific. Some insects look nearly identical to each other, but there will be different species living on one side of a mountain range vs the other side, even if they are only 20 miles apart. And also, researchers who are tracking the movement of species in response to climate change can benefit from having access to accurate data–showing that a species of plant is appearing even several miles north each year is crucial to understanding how to manage environmental stewardship.
The "Captive/Cultivated" checkbox should be selected if your observation is not of a wild organism. Pets, zoo animals, and garden plants would fit into this category. Insects you catch from the outside and rear indoors would not count, and are still considered wild.
Now, let's take a look at these things that are sort of hidden away:
(Tags aren't used much, so we're just going to skip that one.)
First, let's have a look at Projects.
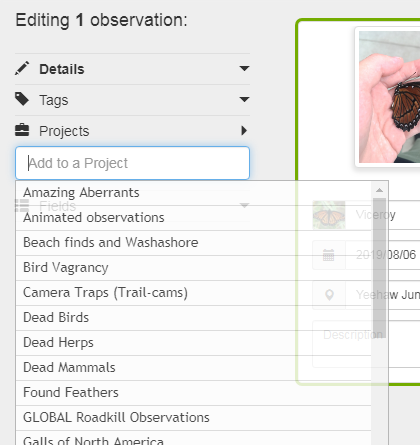
If you've been added to this project, all of your observations will be added automatically. But, some projects need observations that fit their theme to be manually added.
When you click on the box, all the projects you joined will show up as suggestions. You can click to choose any project(s) you would like to add your observation to, but despite all the dead [x] projects, I'm not a part of one for butterflies, so it looks like this observation won't be added to any projects at this time.
Moving on, let's look at Fields:
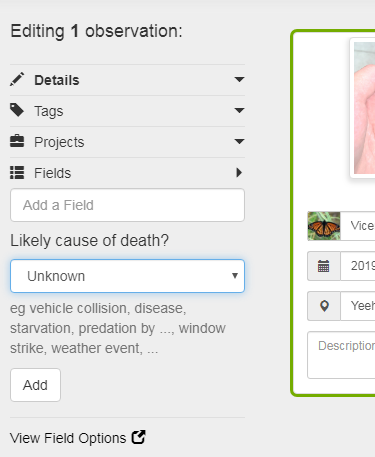
These aren't used often, but they can be really useful on the right observations. I could probably fill some out for this one if I wanted, but I don't know how it died, and I don't really think it's important to say unknown. This one will also go without fields. Unlike projects, you dont need to "join" any fields to add them, but they are more likely to show up once you have used them before. You can just start typing and see what pops up (from my understanding, that is a bit of a peeve some people have with the feature)
Here's some examples of observations with fields:
https://www.inaturalist.org/observations/31203103
https://www.inaturalist.org/observations/27631192
With these, it shows what the host of the organism being observed is.
https://www.inaturalist.org/observations/26514406
https://www.inaturalist.org/observations/17501348
With these, the project "Dead Birds" requests a field filled out for cause of death for any added observations.
Hope that clears that up! Most observations don't make use of that, but it's good to know.
What if I have multiple files for my observation?
Great question! It's important to make sure that all of your files for one observation get put together, otherwise, you'll end up spamming and your observation won't be complete on top of that. Unfortunately, inaturalist doesn't automatically combine them, fortunately, its an easy fix.
So, let's add an open wing picture of my butterfly.
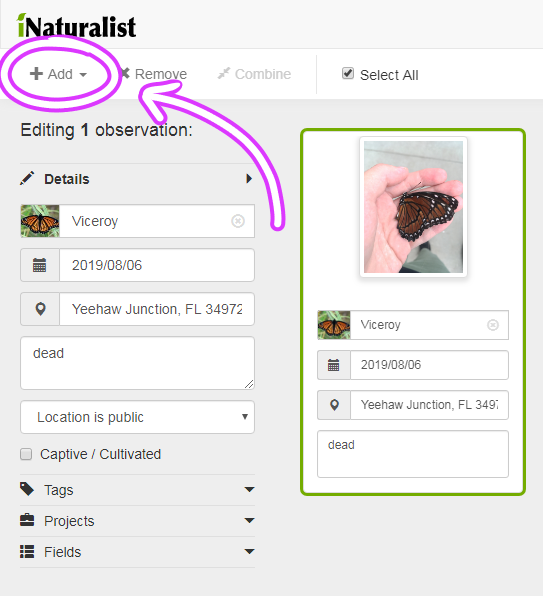
Click "Add" in the top left corner, then choose "Photos or sounds" from the dropdown. Alternatively, drag your files right into the window. If you do it right, it should look like this:
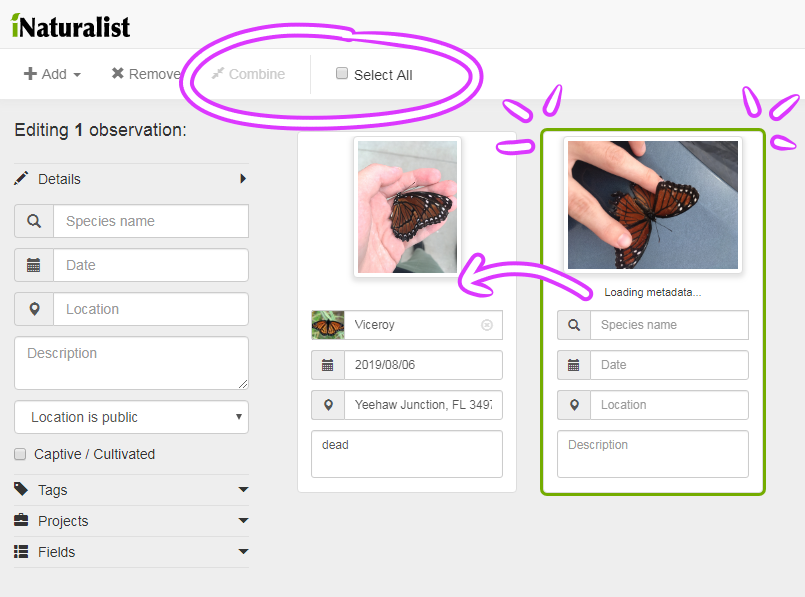
Now, if I post this, I'll end up getting two separate observations, which i don't want, because this is all for the same thing. To combine them, there is a checkbox at the top that says "Select All". When clicked, all the boxes should have a green border (see the difference between the first and second pictures in the above image). Then, by clicking "Combine", they will merge. Alternatively (like I said, there's a lot of ways to do things), you can click and drag one box onto the other to merge them one at a time.
When done successfully, it should look like this:
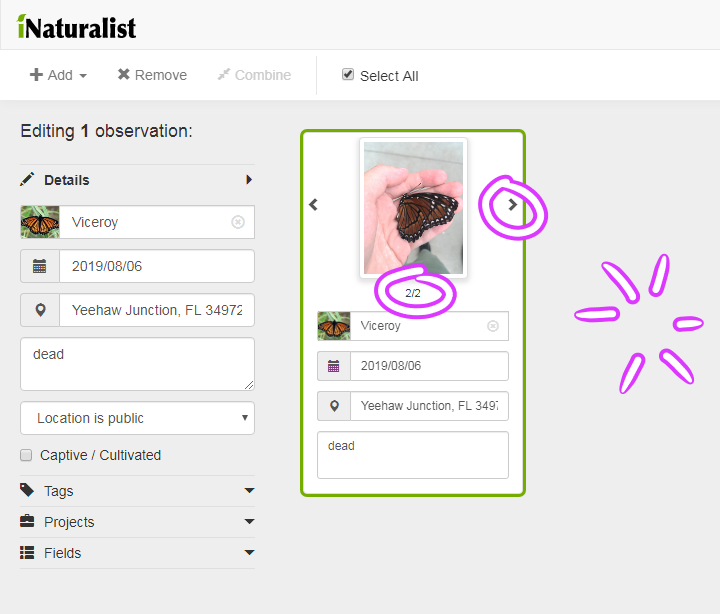
The images are now stacked! You can tell it didn't go away because there are arrows to look through the stack, and that "2/2" underneath the image that shows how many files are there.
Got all that?
All thats left is to publish, which can be found in the top right corner.

Click that button, and it's done! Yay!
What if I have multiple things I want to upload at once?
That can be done! For this, I'll be uploading some photos I took testing a trail camera. This might be a bit advanced, make sure you read the previous sections first.
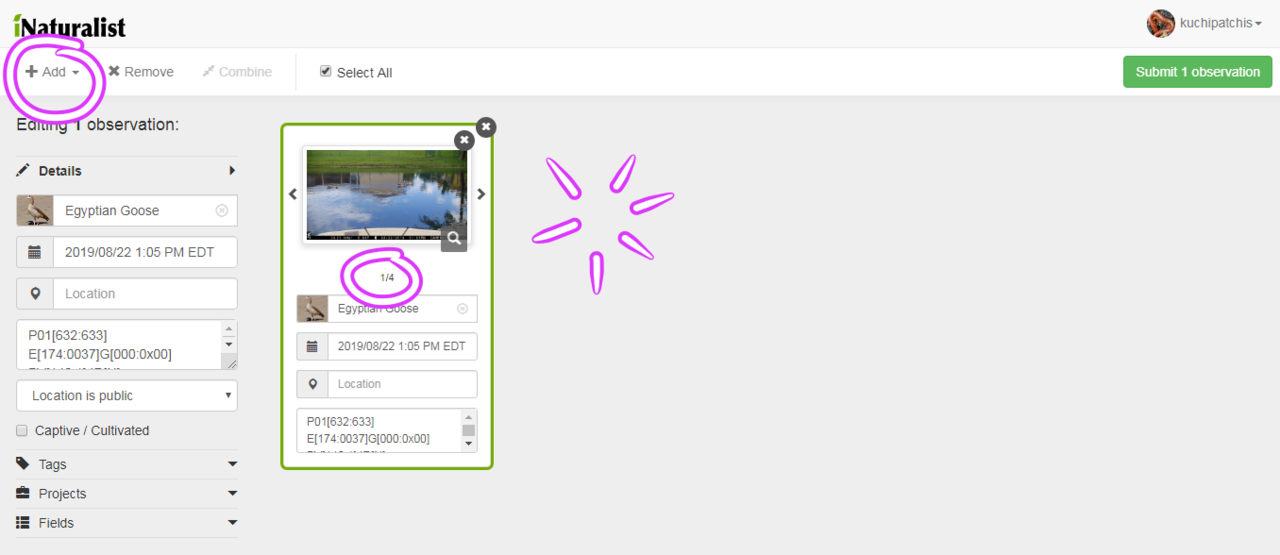
First, I just uploaded a set of Egyptian Geese, just like I did with my viceroy, but with four images this time.
There's a way to edit all these individual ones before combining.
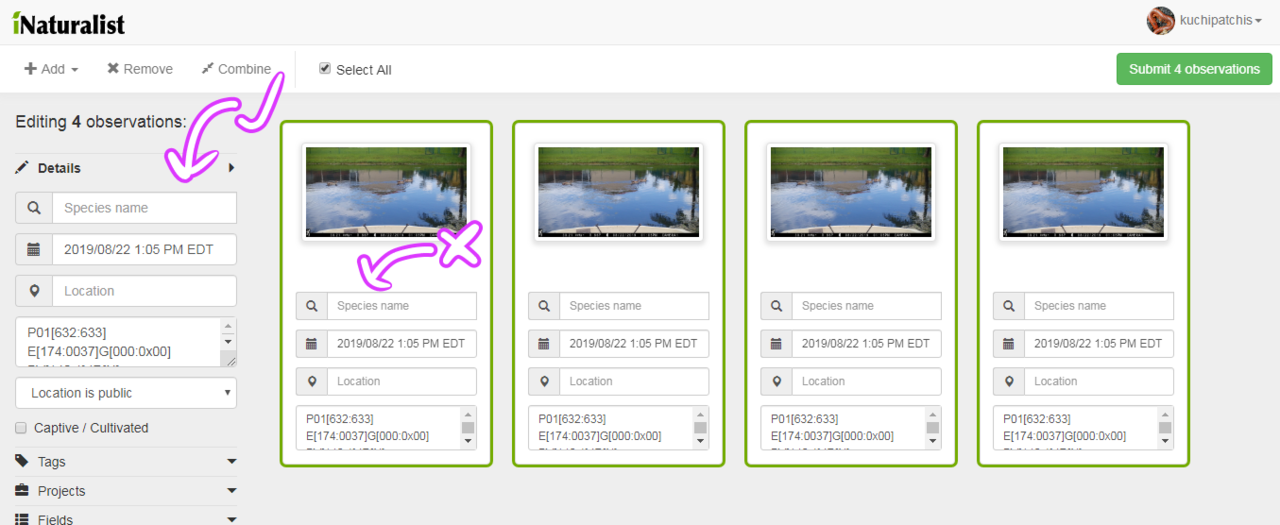
The difference between editing on the side and editing in the observation boxes matters when you're dealing with a lot of observation boxes. I want to name these all Egyptian Goose. So, instead of doing it in the box (which would edit a single observation) I can do it on the side, and then every selected box will change accordingly.
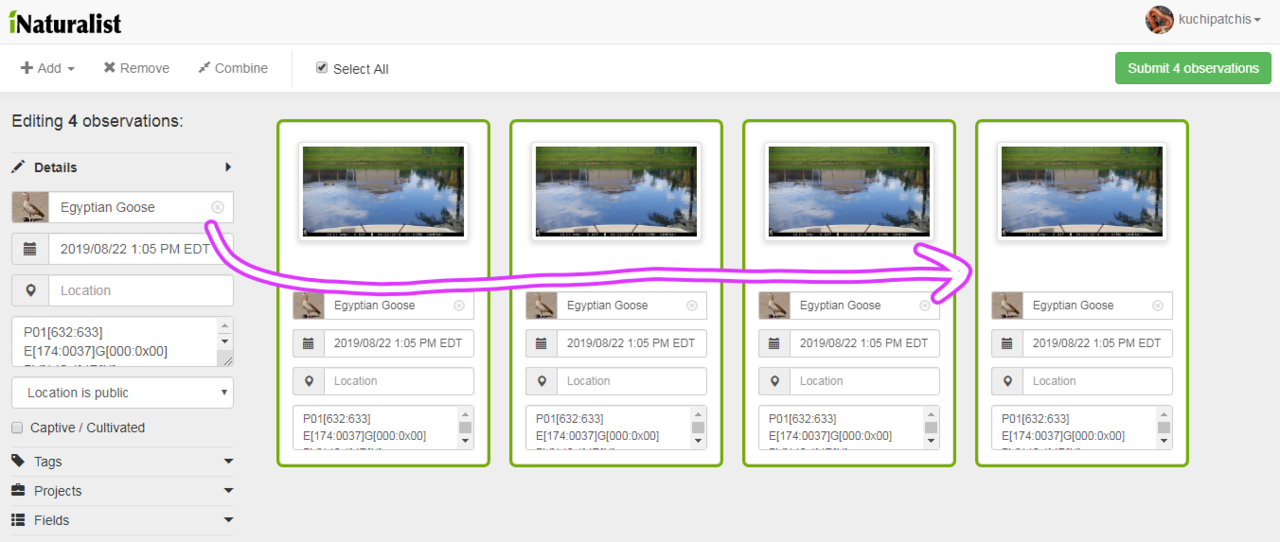
Nice! That's not always necessary, though, because once they are all combined they will share information. Let's get them combined (again, by click and drag, or by selecting and clicking "Combine") so I can move on and add more observations.
Great, all combined! Now let's click "Add" to add more stuff. This time, it'll be a common gallinule.
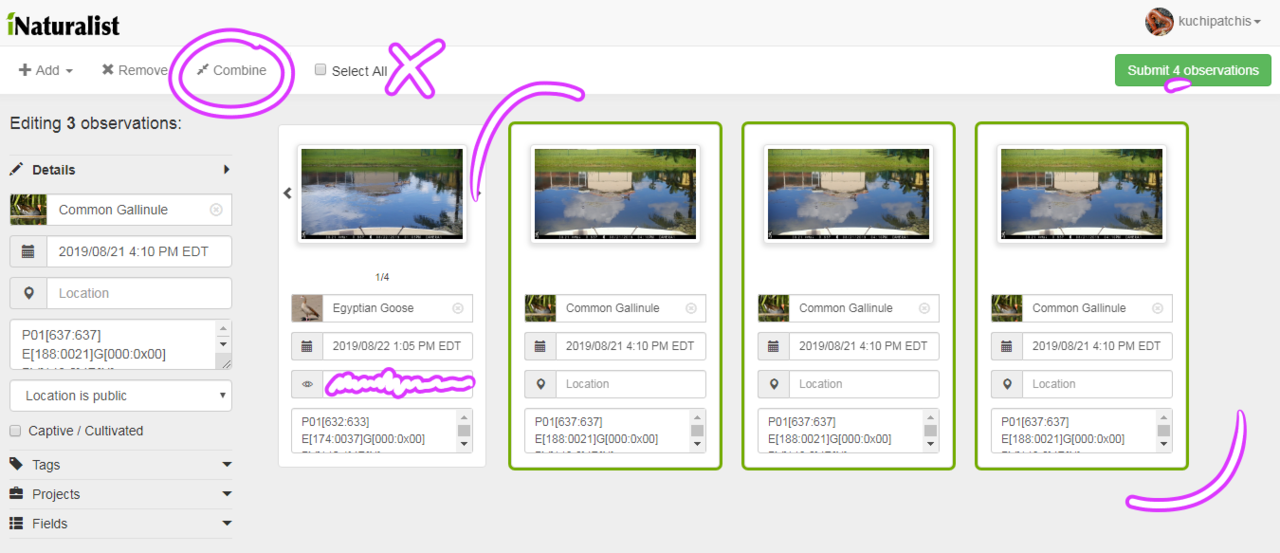
I did the same thing I did with the Egyptian Goose, but if i selected all and combined all, then the geese and the gallinule would merge, and we don't want that. So, instead of selecting all, use the Shift key to only select the observation boxes you want to select, by clicking on them. Then you can hit "Combine" so that only the selected ones combine. Alternatively, you can click and drag to stack at will.
If done successfully, it should look something like this below. This can be done for as many observations as you want.
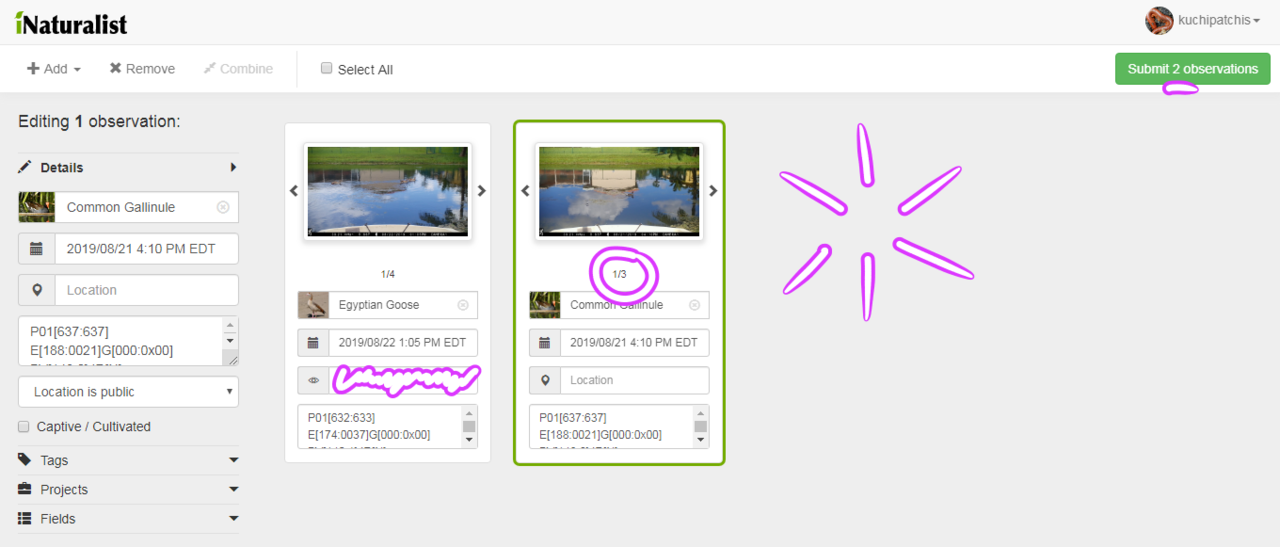
Don't worry if you accidentally do stack observations, you can fix it.
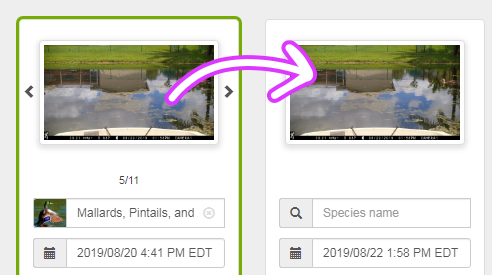
I accidentally merged two different species of ducks, so i had to click on the arrows on either side of the thumbnail, and drag the thumbnails of the other duck out to make it its own observation again. Tedious, but not the end of the world. Then you can resume what you were doing.
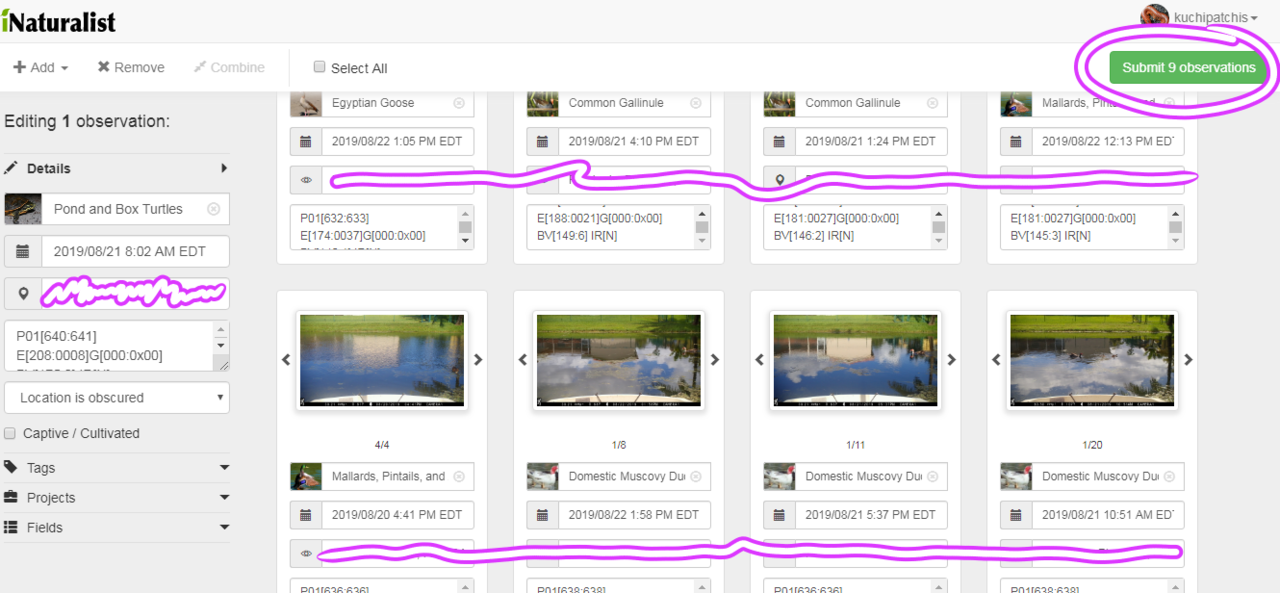
In the end, I made 9 different observations. Make sure to keep an eye on the button where it says "Submit [x] observations", so you know if you are merging properly (make sure if you observed one thing and have 3 pictures, it says "Submit 1 observations" and not "Submit 3 observations"!). Once you know it all checks out, you can click on it.
Then, all of them will upload at once, nice!
 Level 1: Have 10 observations
 Level 2: Have 50 observations
 Level 3: Have 500 observations
 Level 1: Have a 7 day streak
 Level 2: Have a 30 day streak
 Level 3: Have a 90 day streak
 Level 1: Get 10 items off of the list
 Level 2: Get 18 items off of the list
 Level 3: Complete the entire list
 Level 1: Complete the entire list on or before November 1, 2019
 Level 2: Complete the entire list on or before October 16, 2019
 Level 3: Complete the entire list on or before October 1, 2019
 Level 1: Have observed 3 different species of amphibian
 Level 2: Have observed 10 different species of amphibian
 Level 3: Have observed 20 different species of amphibian
 Level 1: Have observed 5 different species of arachnid
 Level 2: Have observed 20 different species of arachnid
 Level 3: Have observed 50 different species of arachnid
 Level 1: Have observed 10 different species of bird
 Level 2: Have observed 50 different species of bird
 Level 3: Have observed 100 different species of bird
 Level 1: Have observed 3 different species of ray-finned fish
 Level 2: Have observed 15 different species of ray-finned fish
 Level 3: Have observed 45 different species of ray-finned fish
 Level 1: Have observed 5 different species of fungi including lichens
 Level 2: Have observed 10 different species of fungi including lichens
 Level 3: Have observed 40 different species of fungi including lichens
 Level 1: Have observed 10 different species of insect
 Level 2: Have observed 50 different species of insect
 Level 3: Have observed 120 different species of insect
 Level 1: Have observed 5 different species of mammal
 Level 2: Have observed 15 different species of mammal
 Level 3: Have observed 30 different species of mammal
 Level 1: Have observed 5 different species of mollusk
 Level 2: Have observed 15 different species of mollusk
 Level 3: Have observed 40 different species of mollusk
 Level 1: Have observed 10 different species of plant
 Level 2: Have observed 40 different species of plant
 Level 3: Have observed 100 different species of plant
 Level 1: Have observed 5 different species of reptile
 Level 2: Have observed 15 different species of reptile
 Level 3: Have observed 45 different species of reptile